Managing staff accounts and the organisation
Castles & Coasts Housing Association (CCHA) — Buyer & Platform Documentation Audience: CCHA staff | Platform: Geckr Procure
How CCHA system administrators create and look after staff accounts — invitations, roles, departments, name and email corrections, authenticator resets, deactivation — and keep the organisation's details, departments and branding in order. It complements the Administrator guide, which covers the rest of the admin area.
Who this is for
Members of CCHA's System administrator role (the sysadmin team) and Geckr's named operator. In the demo tenant, Priya Shah is the administrator persona. Procurement staff cannot open the admin area: when a supplier account needs changing, they ask a system administrator to do the tasks in Supplier accounts.
Before you start
- Sign in with your work account and authenticator code: system administrators must use multi-factor authentication.
- Administration lives in the admin area (
/a). If you also work in the buyer area, use Switch to Admin area in the account menu. - Every change you make is recorded with before and after values, and appears on Admin audit (see What is audited).
- You cannot remove your own system administrator role, reset your own authenticator or deactivate yourself. Keep at least two system administrators so that one can help the other.
Invite a member of staff
Steps
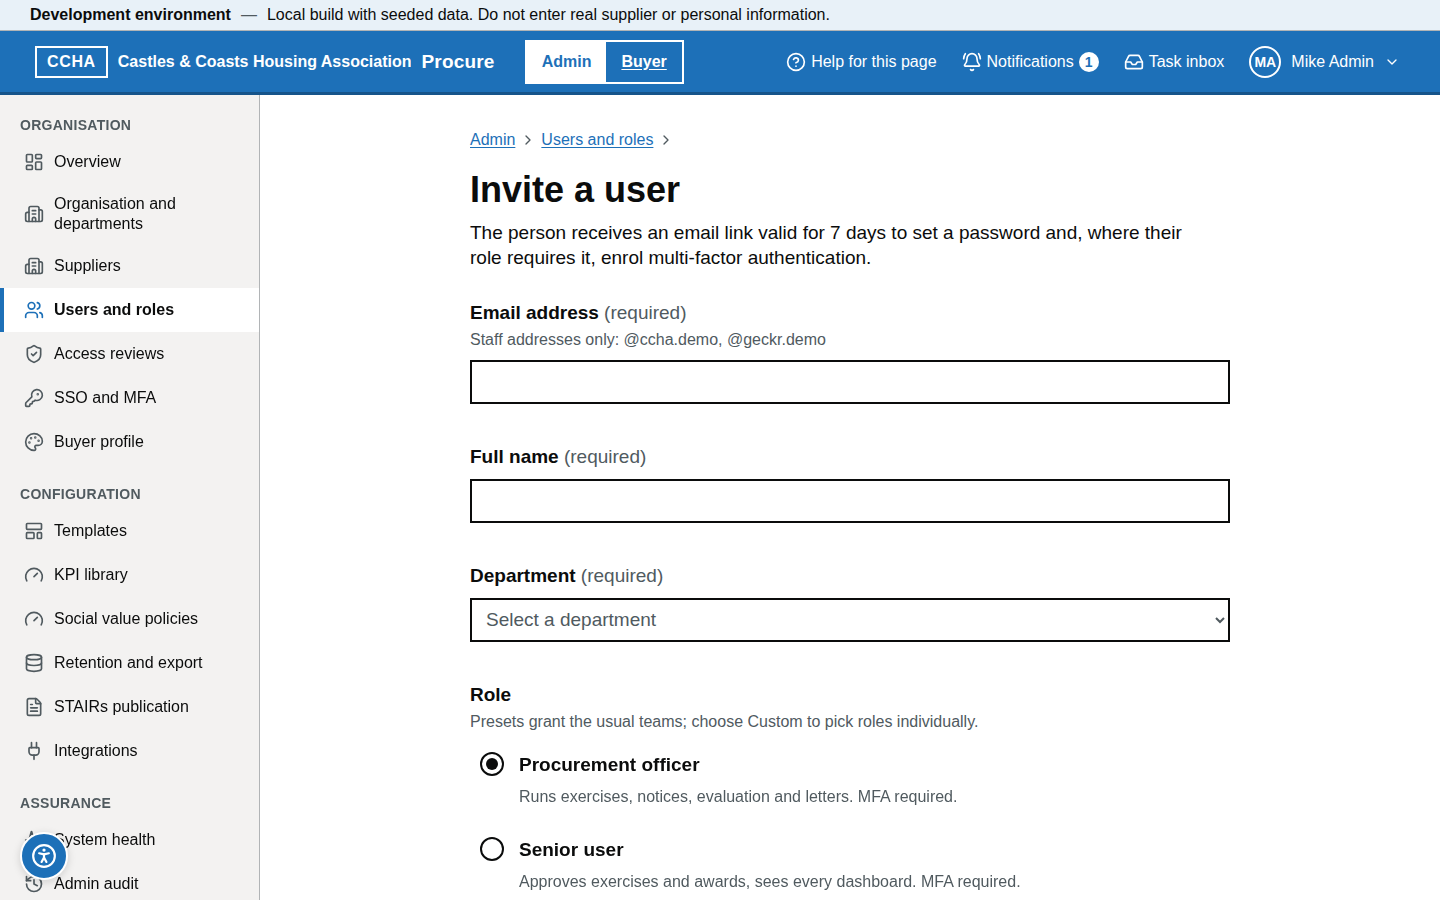
- Open Users and roles (
/a/users) and choose Invite a user. - Enter the person's Email address (a CCHA staff address; the hint lists the allowed domains) and Full name, and choose their Department.
- Under Role choose a preset: Procurement officer, Senior user, Department user, Contract manager, System administrator or Custom. Presets that need two-step verification say "MFA required". For Custom, tick the Organisation roles you want; the department team is always added.
- Choose Send invitation.
What you should see
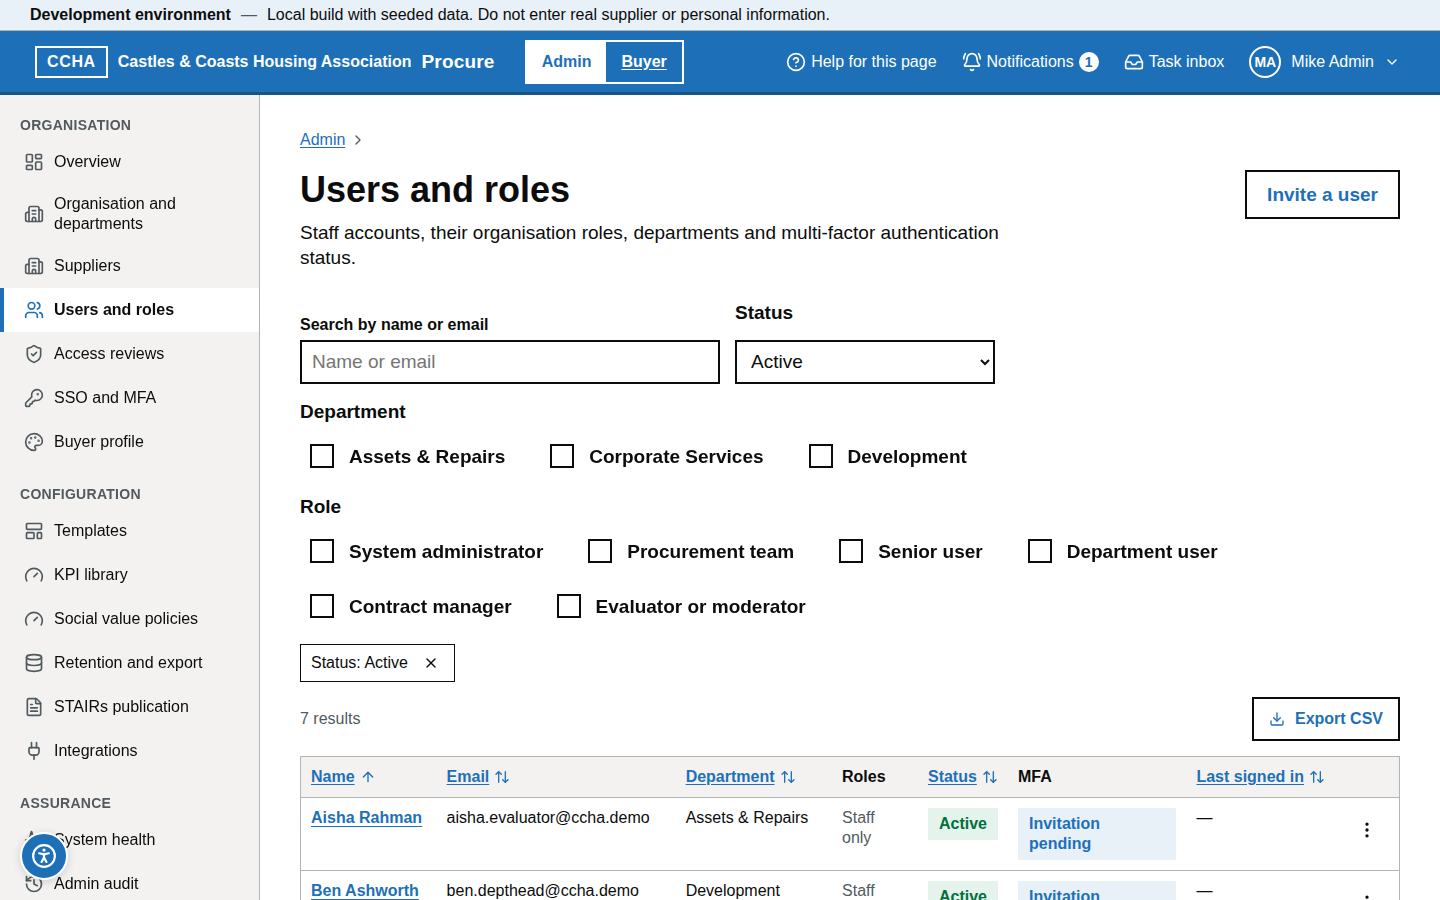
"Invitation sent to" the address, saying whether they must set up multi-factor authentication when they accept. On Users and roles their MFA column shows Invitation pending until they first sign in. The link in the email works for 7 days — see Your staff account: first sign-in for what they do next.
Common problems
- "Must be a … address". Only CCHA staff domains can be invited as staff. Suppliers register themselves or are invited by their own administrator.
- "Account prepared for" instead of "Invitation sent to". The account was created but the email could not be sent. Use Re-send invitation.
- "An existing account that had never signed in was completed rather than duplicated". The person had been invited before; their existing account was reused.
- Contract manager. The preset gives department access only. Contract access is assigned on each contract, not here.
- Demonstration environments. The invitation can be read in the demo mail catcher (Mailpit).
Re-send an invitation
Steps
- On Users and roles, open the row's actions menu and choose Re-send invitation; or open the user and choose Re-send invitation under Account.
- Confirm with Re-send invitation.
What you should see
"Invitation re-sent to" the address. A new link valid for 7 days is emailed and earlier links stop working.
Common problems
- The option is missing. It is offered only for active users who have never signed in. Someone who has signed in and forgotten their password uses Forgotten your password? on the sign-in page.
Change someone's roles
Steps
- On Users and roles, find the person (use Search by name or email or the filters) and choose Edit roles and access.
- Under Organisation roles tick or untick Procurement team, Senior user and System administrator. The page shows what is pending, for example "Pending: add …".
- Choose Save roles.
What you should see
"Roles updated." Changes take effect at the user's next request; they are not signed out. Adding a role that needs two-step verification means they are asked to set it up.
Common problems
- "You cannot remove your own system administrator role." Ask another system administrator.
- Evaluator, moderator or contract access. These are granted on the exercise or contract. They are listed under Exercise, contract and other access, where you can remove them (see below).
Change departments
Steps
- Open the user and go to Departments.
- Choose the Primary department (shown beside their name and used as their default).
- Tick any departments under Also a member of; the person then sees and works on those departments' records too.
- Choose Save departments.
What you should see
"Departments updated."
Common problems
- A department user sees too much. Check Also a member of and any senior role.
Correct a name or e-mail address
Staff cannot change their own email address; you do it for them.
Steps
- Open the user and go to Name and e-mail address.
- Change Display name or E-mail address. Changing the address signs the user out everywhere; they sign in with the new address from then on.
- Choose Save details.
What you should see
"Details updated." When the address changed, the message says the person has been signed out and now signs in with the new address.
Common problems
- The button is disabled. Deactivated accounts cannot be edited; reactivate first.
Remove exercise or contract access
Steps
- Open the user and go to Exercise, contract and other access.
- Choose the × (Remove …) beside the access to take away, and confirm with Remove access.
What you should see
"Access removed". For an exercise, scores the person has already saved are kept for audit, but they lose access immediately.
Common problems
- You meant to review access more widely. Use Access reviews — see Access reviews.
Reset someone's multi-factor authentication
Use this when a member of staff has lost or replaced their phone and has no recovery codes left.
Steps
- Confirm the person's identity by a second channel (for example a call to a known number), not just the email asking for the reset.
- Open the user and go to Multi-factor authentication. Choose Reset MFA.
- Enter a Reason (it is recorded in the audit log) and confirm with Reset MFA.
What you should see
Their authenticator is deleted and every session ended. Next time they sign in with their password they must set it up again and save new recovery codes.
Common problems
- "You cannot reset your own MFA here". Another system administrator must do it.
- Supplier asks for a reset. Not on this page: open Suppliers, choose the supplier and use Reset two-step verification on the person's row under User accounts (see Supplier accounts), after confirming who they are by a second channel.
Deactivate and reactivate an account
Steps
- To deactivate a leaver: on Users and roles choose Deactivate from the row's actions menu, type DEACTIVATE and confirm with Deactivate user; or open the user, choose Deactivate user under Account, enter a Reason and confirm.
- To reactivate: filter the list to deactivated users, choose Reactivate, and confirm with Reactivate user.
What you should see
A deactivated person is signed out everywhere and cannot sign in; their status shows Deactivated. Their history, roles and exercise memberships are kept for audit. When reactivated they sign in with their existing roles, and set up two-step verification again where their role needs it.
Common problems
- You cannot deactivate yourself. Ask another system administrator.
- Removing a department. A department cannot be deleted while any user or exercise still belongs to it: move or deactivate its members first.
Update the organisation details
Steps
- Open Organisation and departments (
/a/organisation). - Under Organisation details edit Organisation name, Postal address (one line per line) and Region, the area of the United Kingdom the address is in. Notices publish the region as Find a Tender shows it on your buyer profile, for example East Cumbria (UKD12). The Short name (slug) was fixed when the organisation was created.
- Under Outgoing email set the From name and From address for emails the service sends.
- Choose Save organisation details.
- Under Test outgoing email, choose an active member of staff in Send a test email to and choose Send test email.
What you should see
The saved details. The postal address is published in every notice and used in letters. The same page holds Notice contact, Exercise approval policy, Pipeline notice, Sealed tenders before opening and Departments; see Organisation and departments.
Common problems
- The procurement team says no notice can be published. The postal address or the Notice contact is missing. Save both.
Manage departments
Steps
- On Organisation and departments, go to Departments and choose Add department.
- Enter the Department name. The Short name (slug) is derived from it (lower-case letters, numbers and hyphens, 2 to 32); you can change it before saving, but not afterwards.
- Choose the Head of department if known, then Add department.
- To rename a department or change its head, open it from the list, make the change and choose Save department.
- To delete one, choose Delete on its row and confirm with Delete department. Delete is unavailable while the department has members.
What you should see
The Departments table with each department's slug and head.
Common problems
- Delete is refused. A department cannot be deleted while any user or exercise still belongs to it.
- You want to change the slug. It names the department's team and is fixed once created.
Set the buyer profile: theme, logo and colours
Steps
- Open Buyer profile (
/a/branding). - Under Theme, choose one of the checked presets and choose Save theme.
- Under Logo, choose Upload a new logo (PNG, SVG or JPG up to 2 MB). It is shown on a white background in the header and on the sign-in page. Until you save, only you can see the new logo.
- Under Optional buyer colours, tick Use buyer colours on top of the selected theme to set a Primary colour (header and primary buttons; needs 4.5:1 contrast against white text) and a Secondary colour (non-text accents and chart marks; needs 3:1 against white).
- Check the Preview, then choose Save branding (or Save branding and apply the new logo).
What you should see
The preview updating as you choose. After saving, staff and suppliers see the new branding when their page next loads.
Common problems
- "These colours cannot be saved". A colour does not meet the contrast it needs. Choose a darker one.
- No logo uploaded. The organisation's initials are shown instead.
- More detail: Branding.
Staff from the Microsoft directory
Microsoft sign-in and the import of staff from CCHA's Microsoft directory (Microsoft Entra ID) are set up by Geckr; there are no Microsoft settings to enter in the admin area.
Steps
- Where the import is set up, the staff CCHA gives access to Geckr Procure in its directory (usually members of one group) get an account automatically, with no roles and no invitation email. Find them in Users and roles (
/a/users). Who has access is decided in CCHA's directory, not in Geckr Procure. - Give access as for an invited member of staff: see Change someone's roles and Change departments.
- To give an imported member of staff a password as well, before they first sign in, use Re-send an invitation.
What you should see
The imported member of staff with no roles until you add them. When they sign in before then, they see Your account has no access assigned yet.
Common problems
- A leaver's account was deactivated without anyone in CCHA doing it. The import deactivates accounts whose Microsoft account was disabled or removed. Reactivate a returning member of staff as in Deactivate and reactivate an account.
- More detail: Microsoft sign-in and the staff directory.
Supplier accounts
Supplier organisations manage their own users. CCHA's system administrators can step in from Suppliers (/a/suppliers) when a supplier cannot help itself — for example when its only administrator has left.
Steps
- Open Suppliers and choose the supplier.
- Under User accounts, use Make administrator or Change to member on the person's row to change a role, Deactivate (type DEACTIVATE to confirm) or Reactivate to stop or restore their sign-in, or Remove to take them out of the organisation. Each records a Reason. Reset two-step verification is there too, for a person who has lost their authenticator: record how you confirmed who they are.
- Use Invite user (or Invite primary contact when the supplier has no users) to invite a new contact.
What you should see
The supplier's user list updated. The supplier sees role changes on its Organisation activity.
Common problems
- The last active administrator cannot be demoted. Make someone else an administrator first.
- See Managing your supplier organisation for what suppliers can do themselves.
What is audited
Admin audit (/a/audit) is a read-only record of changes to organisations, departments, profiles, templates, library documents and the KPI library, plus changes made by system administrators.
Steps
- Open Admin audit.
- Filter by actor, table and London date.
- Open an event to see its before and after values.
What you should see
Each change with who made it, when and what changed. Invitations, role and department changes, name and email corrections, authenticator resets, deactivations and reactivations are all recorded; resets and deactivations also record the reason you gave.
Common problems
- You need the wider procurement audit trail. Procurement and senior users use the Audit explorer in the buyer area — see Search the audit trail.
Getting help
- Account and organisation questions
- The Geckr operator for platform settings, such as email delivery.
- Related: Administrator guide · Your staff account: first sign-in · Signing in, signing out and staying secure.
Glossary links
Multi-factor authentication · Audit chain · Notice contact · Task